To those who are confused, "I don't know what to do next!" As the tasks pile up.
You can easily manage your existing tasks with the Google Tasks list that you can use on your PC or smartphone. This time, let's introduce how to use such a Google Tasks list easily.
Very easy! How to use Google Tasks
Using the Google Tasks list is very easy. If you are using a PC, you can use it by accessing Gmail with a browser. If you have a smartphone, you can get the app and run it.
We will show you how to use each device, so please refer to it.
* Device used HUAWEI Matebook X (Windows 10) iPhone SE 2nd generation (IOS 14.6) Galaxy S20 (Android 11)
To use the Google Tasks for PC, open Gmail in a browser such as Chrome or Safari.
When you open Gmail, you should see the Google Tasks list icon on the right side of the screen (see the photo above). Let's click here.
Then a screen like the one in the picture above will be displayed, so click "Try it". Now you are ready!
Let's fill in one task as a trial. Click "Add Task" at the top of the screen.
Enter the Title, Details, and Start Time. Then click on the blank area of the screen and you should see the task you entered in the ToDo list.
When the task is completed successfully, click the ○ mark displayed to the left of the task name. Then, a line will be added to the task name as shown in the picture below, and it will be automatically deleted from the list.
* A line will be added to the task name.
By the way, when all the tasks are completed, the screen like the above picture will be displayed.
Next, let's use the Google To Do list on your iPhone. By the way, the list created on another device such as a PC can be managed from the iPhone by logging in with the same Google account.
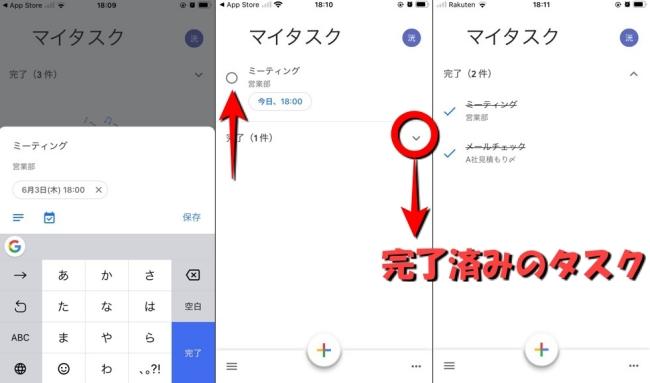
First, start the app and tap "Try it". If the account selection screen appears, select the account you use all the time.
Next, tap the "+" mark at the bottom of the screen.
You can create a task, so enter the task name. Enter details and notification time if necessary and select "Save".
Then the task will be displayed as shown in the center of the photo above. When the task is completed successfully, tap the circle to the left of the task name. The task is complete.
You can check the completed task by tapping the part where "Completed (○)" is written. The completed task has a line as shown on the right in the above photo for easy understanding.
Using Google Tasks on your Android smartphone is also very easy. After installing the app, let's start it immediately.
There is a + mark at the bottom of the screen, so tap here. You can create tasks. Enter the task name in "New Task". Enter the details and time if necessary and tap "Save". This completes the task creation.
When the task is completed, tap the ○ mark to the left of the task name to complete it. If you want to check the completed tasks, tap "Completed (○)". You can see that there is a line in the task name.
To change the notification method in the Google ToDo list for the smartphone app, use the settings app.
1: Open the settings app. 2: Select "Notification". 3: Select "To Do List". 4: You can change the notification settings.
1: Open the settings app. 2: Tap "Apps". 3: Select "To Do List". 4: Tap "Notification". 5: You can change the notification settings.
To delete a completed task, follow these steps:
1: Display the Google To Do list.
2: Click the mark on the right side of "Completed (○)" displayed at the bottom of the screen.
3: Click the trash can mark to complete.
The basic flow is almost the same for both iPhone and Android.
1: Launch the ToDo list app. 2: Tap the mark on the right side of "Completed (○)". 3: Tap the task you want to delete. 4: Tap the trash can mark at the top right of the screen to complete.
* Data is from the editorial department as of early June 2021. * Although every effort has been made to ensure that the information is complete, we do not guarantee the completeness or accuracy of the content. * Please use and operate the product at your own risk.


